---
description: "Connect paid Plandalf purchases to MailerLite subscribers and groups, then verify email countdowns and affiliate links."
---
# MailerLite

Use [Plandalf with MailerLite](https://plandalf.com/platforms/mailerlite) to find or create a subscriber after payment, add them to a group and update their fields. MailerLite handles the email campaign. Plandalf handles checkout, promo enrollment and purchase records.

> [!NOTE]
> **Verification status**
> The connection form and action selection below were captured in the running app. The account connection, subscriber changes and complete email-to-purchase replay are still pending. Treat this as a setup guide under verification, and test your own account before enabling it for buyers.

## Choose the journey

| Product | Start here | Result to check |
| --- | --- | --- |
| Checkouts | [Link to checkout](#link-to-checkout) | The correct checkout, sandbox payment and paid invoice |
| Automations | [Add the buyer to MailerLite](#add-the-buyer-to-mailerlite) | The matching subscriber ID and group in MailerLite |
| Timers / Promos | [Use a recipient countdown](#use-a-recipient-countdown) | The same participant and deadline in the email and checkout |
| Affiliates | [Keep referral attribution](#keep-referral-attribution) | The intended partner on the paid sale and commission decision |

## Prepare a controlled test

-   Use a current MailerLite account with API access. This integration targets the current API, not MailerLite Classic.
-   Choose a test subscriber inbox you control and a dedicated group. Keep campaigns and MailerLite workflows attached to that group paused during setup.
-   Prepare a published Plandalf offer with the intended price and an actual payment-provider sandbox. A checkout’s Test setting alone is not proof that the connected processor is a sandbox.
-   Keep the MailerLite API key in your approved password manager. Enter it only in the connection form; keep it out of page code, screenshots, guides and replay logs.
-   Decide which buyers should enter your mailing workflow. A paid invoice does not itself record permission to send marketing email.

Plandalf test payments can still cause real MailerLite subscriber changes. The connection uses the MailerLite account you select; use your isolated group throughout this walkthrough.

## Connect MailerLite

1.  Open **Automation** in the intended Plandalf organization and open its MailerLite integration setup. Choose **Create New Integration** if an approved connection is not already available.
2.  Give the integration a recognizable name for this test account.
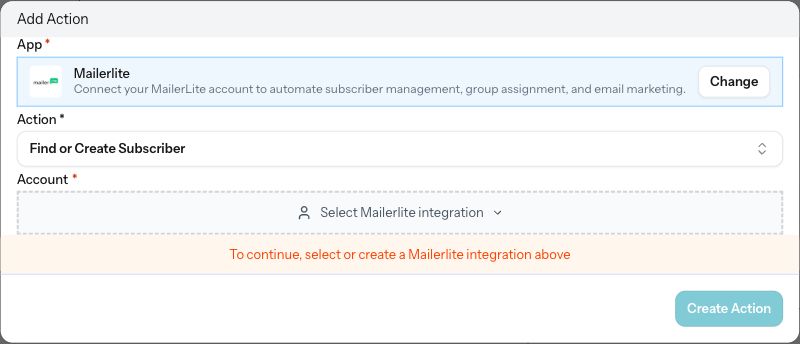
3.  Use **Get your MailerLite API key** to open MailerLite’s API settings. Copy your approved key into **API Key**, then select **Create Integration**.
4.  Confirm the connection check succeeds. A saved integration with an authentication error is not ready. Check the account before selecting it in a sequence.

<figure data-docs-annotated-screenshot="" style="margin:1.5rem 0"><div style="position:relative;line-height:0"><img src="/images/integrations/mailerlite/connection-form.png" alt="Real Plandalf Create Mailerlite Integration form with an API settings link, Integration Name, empty API Key and disabled Create Integration button." width="500" height="610" loading="lazy" style="display:block;width:100%;height:auto;margin:0;border-radius:0"><svg xmlns="http://www.w3.org/2000/svg" viewBox="0 0 500 610" aria-hidden="true" focusable="false" style="position:absolute;inset:0;width:100%;height:100%;pointer-events:none"><g><line x1="345" y1="250" x2="206" y2="303" stroke="white" stroke-width="12"></line><line x1="345" y1="250" x2="206" y2="303" stroke="#b5264d" stroke-width="6"></line><polygon points="206,303 223.83447039408276,305.435501131715 217.68540901366498,289.30871751137397" fill="#b5264d"></polygon><circle cx="345" cy="250" r="27" fill="#b5264d" stroke="white" stroke-width="4"></circle><text x="345" y="260" text-anchor="middle" fill="white" font-size="29" font-weight="700" font-family="system-ui,sans-serif">1</text></g><g><line x1="386" y1="381" x2="248" y2="455" stroke="white" stroke-width="12"></line><line x1="386" y1="381" x2="248" y2="455" stroke="#b5264d" stroke-width="6"></line><polygon points="248,455 265.9994540234819,455.1401957793965 257.8431171938095,439.9297297997371" fill="#b5264d"></polygon><circle cx="386" cy="381" r="27" fill="#b5264d" stroke="white" stroke-width="4"></circle><text x="386" y="391" text-anchor="middle" fill="white" font-size="29" font-weight="700" font-family="system-ui,sans-serif">2</text></g></svg></div><figcaption style="line-height:1.6;margin-top:1rem"><p>Connection form before credentials are entered. No account connection is claimed by this screenshot.</p><ol style="list-style-type:decimal;padding-left:1.5rem"><li>Open the provider's API settings.</li><li>Enter the approved account key here, never in email HTML.</li></ol></figcaption></figure>

If the check fails, keep the sequence off. Recheck the key’s account and validity, then resolve the connection error before running subscriber actions. Do not repeatedly create connections to work around an unresolved error.

## Link to checkout

1.  In Plandalf, open the offer’s **Share** tab and copy its test checkout link. Follow [Hosted checkout](https://plandalf.com/docs/product-guides/checkouts/hosted-checkout) if the offer is not ready.
2.  Put that URL on a button or text link in the MailerLite campaign. Email should open checkout through a link; do not insert the JavaScript SDK or an iframe into email HTML.
3.  Preview the message and inspect the link destination. For the full replay, use an approved delivery to your controlled subscriber and click the link in the received message.
4.  Confirm the offer, amount, currency and processor sandbox before payment. Match the completed payment to its paid Plandalf invoice.

Linking an email button does not create the subscriber workflow below. Configure and verify it separately if buyers should join a MailerLite group.

## Add the buyer to MailerLite

### Choose the payment event

In **Automation → My Sequences**, choose **Create Sequence**, name it for your test offer and leave it **Off** while configuring it. Add a Plandalf trigger:

-   **Invoice Paid** includes checkout payments, upsells, paid renewals and admin invoices.
-   **Checkout completed** is the narrower choice for the main checkout conversion.

Configure the trigger’s offer filter for the intended test offer. Before enabling the sequence, verify the selected event sample belongs to the test buyer and includes an email. A sample from an unrelated invoice can change the wrong subscriber when used in an action test.

### Find or create the subscriber

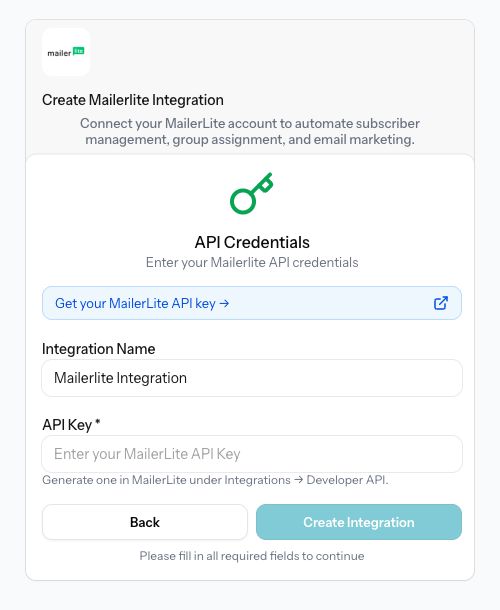
Choose **Add Action → Mailerlite → Find or Create Subscriber**, then select the connection you checked above. The dialog requires an account before it allows **Create Action**.

<figure data-docs-annotated-screenshot="" style="margin:1.5rem 0"><div style="position:relative;line-height:0"><img src="/images/integrations/mailerlite/subscriber-action.png" alt="Real Add Action dialog with Mailerlite, Find or Create Subscriber, an empty Account selector and a disabled Create Action button." width="800" height="344" loading="lazy" style="display:block;width:100%;height:auto;margin:0;border-radius:0"><svg xmlns="http://www.w3.org/2000/svg" viewBox="0 0 800 344" aria-hidden="true" focusable="false" style="position:absolute;inset:0;width:100%;height:100%;pointer-events:none"><g><line x1="563" y1="93" x2="350" y2="149" stroke="white" stroke-width="12"></line><line x1="563" y1="93" x2="350" y2="149" stroke="#b5264d" stroke-width="6"></line><polygon points="350,149 367.4715699640836,153.3294622056478 363.0830463646059,136.63739922906296" fill="#b5264d"></polygon><circle cx="563" cy="93" r="27" fill="#b5264d" stroke="white" stroke-width="4"></circle><text x="563" y="103" text-anchor="middle" fill="white" font-size="29" font-weight="700" font-family="system-ui,sans-serif">1</text></g><g><line x1="137" y1="282" x2="392" y2="211" stroke="white" stroke-width="12"></line><line x1="137" y1="282" x2="392" y2="211" stroke="#b5264d" stroke-width="6"></line><polygon points="392,211 374.4676510087665,206.92363656556554 379.0970898591431,223.55049440846747" fill="#b5264d"></polygon><circle cx="137" cy="282" r="27" fill="#b5264d" stroke="white" stroke-width="4"></circle><text x="137" y="292" text-anchor="middle" fill="white" font-size="29" font-weight="700" font-family="system-ui,sans-serif">2</text></g></svg></div><figcaption style="line-height:1.6;margin-top:1rem"><p>The real builder stops here until a MailerLite account is connected. Field configuration and provider results still need replay.</p><ol style="list-style-type:decimal;padding-left:1.5rem"><li>Choose Find or Create Subscriber.</li><li>Select the approved connection before creating the step.</li></ol></figcaption></figure>

After selecting the account, configure these action fields using the trigger data:

| Field | Invoice Paid value |
| --- | --- |
| Email Address | `{{trigger.customer_email}}` |
| Name | `{{trigger.customer_first_name}}` |
| Last Name | `{{trigger.customer_last_name}}` |

Name and Last Name are optional. Check the resolved values before testing the action. Its result includes `subscriber_id`, `email` and `status`.

The action sends an upsert request using the email address: an existing subscriber is updated instead of intentionally creating a second record. Check that behavior against the actual subscriber ID in your account. See [MailerLite’s subscriber API](https://developers.mailerlite.com/api/subscribers).

### Add the subscriber to a group

Add **Mailerlite → Add Subscriber to Group** using the same connection. Set **Subscriber ID** from the preceding action’s `subscriber_id` output using the variable picker. Select the dedicated test **Group**. Do not put the buyer’s email in the Subscriber ID field.

Test with the controlled subscriber, then open that subscriber in MailerLite and confirm the exact group. Keep its ID in the private replay record so later checks can distinguish an updated subscriber from a duplicate.

### Update fields when needed

Use **Update Subscriber Fields** for additional fields. Supply the same **Subscriber ID** and a nonempty **Fields** map. Keys must match the provider’s existing field names, such as `company` or a custom field you created. Check the resulting values in MailerLite after the action runs.

These actions do not configure a campaign or remove a subscriber from a group after a refund. If a group starts another workflow, verify that workflow and its consent requirements before enabling it.

## Use a recipient countdown

An email countdown is an image. The purchase happens after the reader follows the checkout link.

1.  [Create the promo](https://plandalf.com/docs/product-guides/promos/create-promo) and choose its deadline or enrollment behavior. For enrollment-based timing, enroll the test participant before testing the message.
2.  Choose one stable participant reference. An opaque value made from letters, digits and hyphens avoids placing the recipient’s email in the URL. Store that value in a MailerLite custom field, for example `plandalf_ref`.
3.  In MailerLite’s **Subscribers → Fields**, confirm the field’s exact personalization tag. An example is `{$plandalf_ref}`; use the tag shown for your account.
4.  Copy the promo’s actual countdown image snippet from Plandalf. Set its `ref` query value to that tag. Preserve the image URL and its other parameters; use `&amp;` for an additional query parameter inside HTML when the URL already contains `?`.
5.  Give the purchase link the same recipient value through `pf_ref` and use a checkout configured for that promo. Follow [CTA links and redirects](https://plandalf.com/docs/product-guides/promos/cta-links). Displaying an image alone does not apply a promo price to checkout.
6.  Test with two controlled subscribers with distinct references. Confirm each resolved image URL and purchase link use the intended value, then check the deadline and actual checkout amount before and after expiry.

If you use a reference containing reserved URL characters, encode the value before storing it for URL use and verify it resolves to the original participant. Never use one shared fallback reference for all recipients.

MailerLite custom tags may not resolve in an ordinary test email. Use a controlled subscriber delivery when checking personalization, as described in [MailerLite’s variable guide](https://www.mailerlite.com/help/how-to-use-variables-in-mailerlite). Email image caching can also preserve an older countdown frame; verify expiry and pricing in the opened checkout.

### Enrollment from a subscriber event

Plandalf has an **Enroll in Promo** action with **Promo**, **Ref** and optional **Email** fields. A sequence can map an incoming subscriber’s stable reference into that action.

The complete MailerLite incoming-webhook path still needs verification. MailerLite’s current instructions show a **Webhook** step configured with a URL and Secret Key; they do not establish a configurable JSON body. Do not assume that pointing this step at a promo catch URL supplies the required `ref` field. Inspect the actual payload, validate its signature at the receiving endpoint, map the reference, and verify one participant and the expected deadline before enabling it. See [MailerLite’s webhook instructions](https://www.mailerlite.com/help/webhooks).

Until that path is verified, prepare the test participant through the existing Plandalf promo enrollment workflow. Keep the email countdown replay separate from any claim of automatic enrollment on MailerLite signup.

## Keep referral attribution

Follow the [affiliate quickstart](https://plandalf.com/docs/product-guides/affiliates/quickstart) to prepare an approved test partner in the same Plandalf organization as the checkout.

1.  Put the intended partner’s referral link on the campaign button. For a website landing page, install the organization’s SDK there and follow that platform’s guide before opening checkout. For a direct hosted checkout link, preserve the configured referral parameter.
2.  Start with a fresh visitor session and click the actual received email link. Email click tracking can rewrite links, so inspect the final destination and confirm the partner click in Plandalf.
3.  Complete a verified sandbox payment. Match the invoice to the affiliate sale, intended partner and commission decision.
4.  Test a decline, refund and duplicate event; for subscriptions, verify a paid renewal without a new click.

The default `via` parameter identifies the partner. `pf_ref` identifies the promo participant. They are different values and must not overwrite each other. A MailerLite subscriber or group is not evidence of an affiliate commission.

For a test partner, a calculated commission may be skipped with `test_or_preview`; that preview is not payable earnings. Native Plandalf checkout reports the paid invoice internally, so do not also report the same payment through the sales API.

## Replay and sign off

Enable only the scoped test sequence after checking its account, sample and destination group. Use a fresh test invoice for the paid-trigger replay, then pause the sequence after the test if it is not ready for buyers.

| Check | Required result |
| --- | --- |
| New buyer | Successful processor test payment, matching paid invoice, completed sequence, one intended subscriber and correct group |
| Existing subscriber | Same subscriber ID, correct updated fields and group |
| Unsubscribed subscriber | Status remains appropriate; the action does not silently override subscription choices |
| Duplicate event | No duplicate subscriber and no unintended repeated downstream email |
| Declined payment | No paid invoice and no subscriber change caused by this paid-event sequence |
| Failed action | Failure is visible; fix the cause and verify recovery without duplicating downstream work |
| Refund or renewal | The explicitly chosen group, access and commission behavior occurs; do not assume automatic group removal |
| Countdown | Distinct recipient references, expected deadlines and matching checkout prices across expiry |
| Affiliate link | Email redirect preserves attribution; paid sale and commission match the intended partner |

Record expected and actual results per step, with sanitized screenshots of the provider subscriber and group alongside the matching invoice. Replay from a fresh sequence using this guide before checking it complete. The screenshots on this page currently cover setup only.

## Related guides

-   [MailerLite integration overview](https://plandalf.com/platforms/mailerlite)
-   [Create a checkout](https://plandalf.com/docs/product-guides/checkouts/create)
-   [Create a promo](https://plandalf.com/docs/product-guides/promos/create-promo)
-   [Affiliate tracking for subscriptions](https://plandalf.com/docs/product-guides/affiliates/subscriptions)
-   [Custom API delivery](https://plandalf.com/docs/product-guides/platforms/custom-api)

Source: https://plandalf.com/docs/product-guides/platforms/mailerlite